In the manual

How DARA works

DARA puts the apps on your PC on channels. Each channel has its own plugins, and it sends to one or more mixes at its own level.

A mix is one place your sound goes, like your headphones, a voice chat or a stream. So the game can be loud in your headphones and quiet for your friends.

Install

  1. Get the installer from the download page.
  2. Run it. Windows asks for admin rights once, for the audio driver.
  3. Open DARA. Leave Launch DARA selected on the last page, or open DARA from the Start menu.
  4. Activate it. DARA asks for your key before anything else. Paste the key from your purchase email and choose Activate DARA.

You need Windows 10 (2004 or later) or Windows 11 on an x64 PC. Arm PCs aren’t supported.

First launch

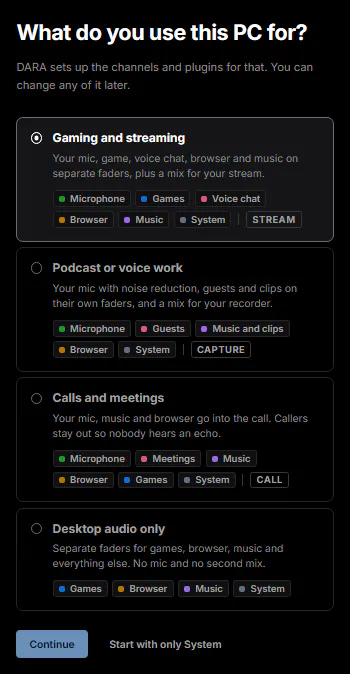
After you activate DARA, it asks what you use this PC for. Then it finds your audio devices and the apps on this PC, and builds channels to match.

  1. Pick a setup. Choose the one closest to how you use this PC, then click Continue. To build everything yourself, choose Start with only System instead.
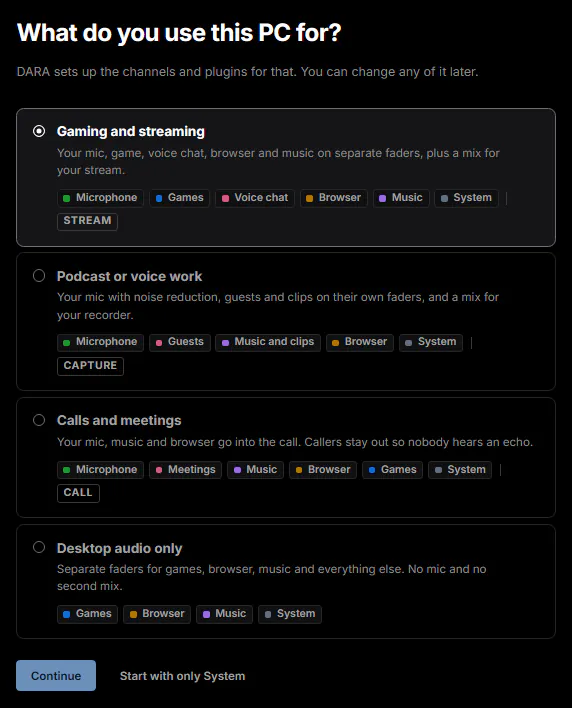
DARA asks “What do you use this PC for?” and lists four setups: Gaming and streaming, Podcast or voice work, Calls and meetings, and Desktop audio only, each with the channels it makes. Gaming and streaming is picked. Under the list are Continue and Start with only System.DARA asks “What do you use this PC for?” and lists four setups: Gaming and streaming, Podcast or voice work, Calls and meetings, and Desktop audio only, each with the channels it makes. Gaming and streaming is picked. Under the list are Continue and Start with only System.
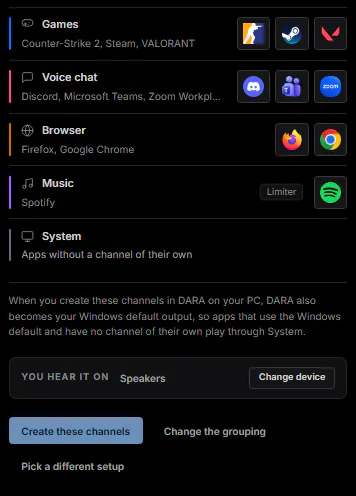
  1. Check the channels. DARA shows each channel and the apps it found for it. Choose Change the grouping to move an app, or Create these channels when it looks right.
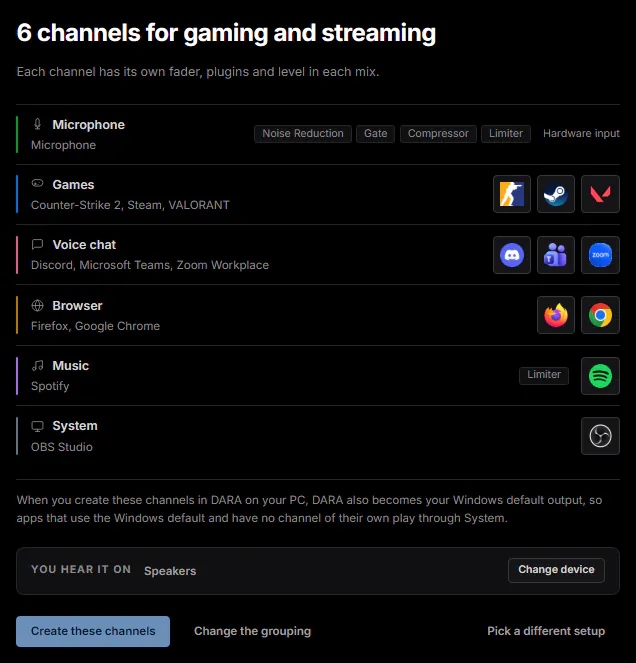
The setup DARA proposes for Gaming and streaming: six channels with the apps it found. The Microphone gets its effects, Games has Counter-Strike 2, Steam and VALORANT, Voice chat has Discord, Microsoft Teams and Zoom Workplace, then Browser, Music and System. Under them are the device you hear it on, with Change device, and Create these channels.The setup DARA proposes for Gaming and streaming: six channels with the apps it found. The Microphone gets its effects, Games has Counter-Strike 2, Steam and VALORANT, Voice chat has Discord, Microsoft Teams and Zoom Workplace, then Browser, Music and System. Under them are the device you hear it on, with Change device, and Create these channels.
The setup DARA proposes for Gaming and streaming, from the Games row down: Games has Counter-Strike 2, Steam and VALORANT, Voice chat has Discord, Microsoft Teams and Zoom Workplace, then Browser, Music and System. Under them are the device you hear it on, with Change device, and Create these channels.The setup DARA proposes for Gaming and streaming, from the Games row down: Games has Counter-Strike 2, Steam and VALORANT, Voice chat has Discord, Microsoft Teams and Zoom Workplace, then Browser, Music and System. Under them are the device you hear it on, with Change device, and Create these channels.
  1. Check who hears what. If your setup has a second mix, like Stream, DARA shows which channels go into it. Choose Looks right to carry on.
  2. Point your other apps at DARA. DARA lists the apps that keep their own device setting and shows where to change it. Point apps at DARA has the same steps.

To start over, open Settings and choose Redo… next to First-time setup. This replaces every channel and mix you have now.

Channels

A channel is one column in the mixer. It has a color bar and a name at the top, then the apps on it, its plugins and its sends. You can have up to ten channels.

Click the + after the last channel to add one. There are three kinds:

  • Audio channel. One or more apps, like a game or Spotify.
  • Input channel. Your mic, or another input on your audio interface.
  • MIDI channel. The built-in synth or your instrument plugins, played from a MIDI keyboard.

Double-click a channel’s name to rename it, or press F2. Right-click the channel for the rest, like Edit color & icon…, Solo and Remove channel.

Drag a channel by its name to move it, and drag its right edge to change its width. The right-click menu also has Duplicate, Collapse and Pin channel, which keeps the channel on the left. Click a channel’s color bar to solo it.

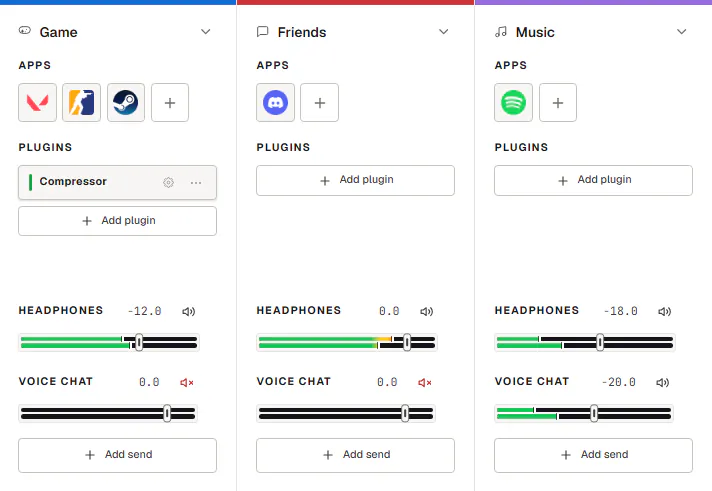
The Games, Voice chat and Browser channels side by side. Each shows its apps, its plugins and its MONITOR and STREAM sends.The Games, Voice chat and Browser channels side by side. Each shows its apps, its plugins and its MONITOR and STREAM sends.

Add apps

Apps without a channel play in System until you add them to one.

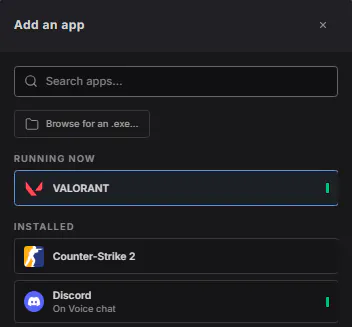
  1. Click the + tile under Apps on the channel. The Add an app window opens.
  2. Pick the app. Apps under Running now come first, then everything under Installed.
  3. Add an app that isn’t listed. Choose Browse for an .exe… and pick the app’s file. It shows up under Added by you.
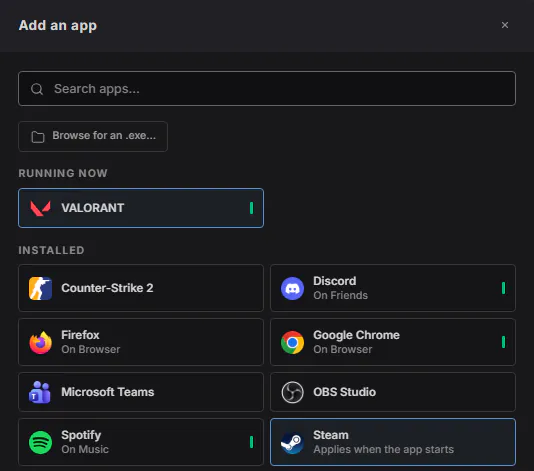
Add an app, opened from the Games channel. VALORANT (running now) and Steam are already on the channel. Counter-Strike 2 is first in the Installed list, about to be clicked. Apps on other channels say which channel they’re on, like Discord on Voice chat. Above the list are the search field and the Browse for an .exe… button.Add an app, opened from the Games channel. VALORANT (running now) and Steam are already on the channel. Counter-Strike 2 is first in the Installed list, about to be clicked. Apps on other channels say which channel they’re on, like Discord on Voice chat. Above the list are the search field and the Browse for an .exe… button.
Add an app, opened from the Games channel, in a narrow window. VALORANT (running now) is already on the channel. Counter-Strike 2 is first in the Installed list, about to be clicked. Under it is Discord, which is on the Voice chat channel. Above the list are the search field and the Browse for an .exe… button.Add an app, opened from the Games channel, in a narrow window. VALORANT (running now) is already on the channel. Counter-Strike 2 is first in the Installed list, about to be clicked. Under it is Discord, which is on the Voice chat channel. Above the list are the search field and the Browse for an .exe… button.

To move an app to another channel, drag its tile onto that strip. An app that isn’t running yet moves as soon as it starts.

If an app doesn’t move, it keeps its own device setting. See Point apps at DARA.

Plugins

Each channel has its own plugins.

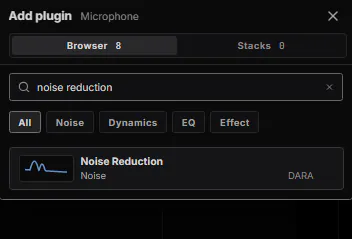
  1. Click Add plugin on the channel.
  2. Pick a plugin. Choose a built-in one, or one of your VST3 or CLAP plugins.
  3. Set it up. Double-click its card, or click its gear, to open it. Drag cards up or down to change the order.
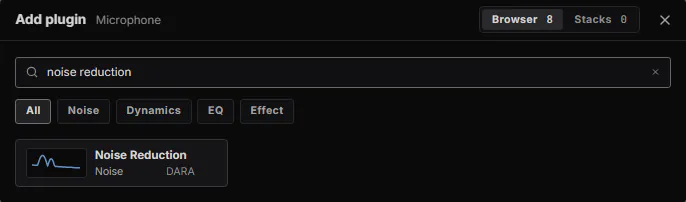
Add plugin, opened on the Microphone channel, with “noise reduction” typed in the search field. It lists DARA’s Noise Reduction. Under the search field are the types All, Noise, Dynamics, EQ and Effect.Add plugin, opened on the Microphone channel, with “noise reduction” typed in the search field. It lists DARA’s Noise Reduction. Under the search field are the types All, Noise, Dynamics, EQ and Effect.

Some of DARA’s built-in plugins:

Built-in plugins, each with one of its presets
PluginWhat it’s forPreset to try
Noise ReductionTakes background noise out of your mic.Keyboard & mouse
GateQuiets your mic while you’re not talking.Breaths & clicks
EQ-8Changes the tone of your voice.Less boomy
FilterCuts rumble, hiss or the low hum that electrical power can add to a recording.Cut rumble
CompressorBrings loud and quiet words closer together.Even out my voice
LimiterStops sudden peaks from getting too loud.Safety catch
De-EsserSoftens sharp S and Z sounds.Harsh S sounds

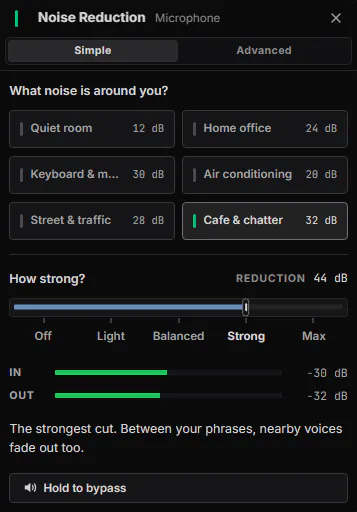
Each of these opens in Simple. Pick a starting point, then how strong, from Off to Max. Advanced has every control.
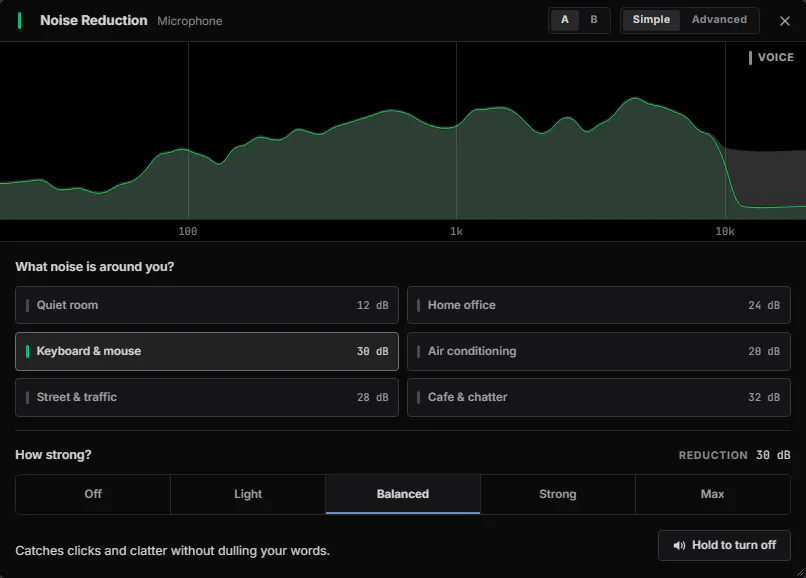
The Noise Reduction editor on the Microphone channel, Simple view. It asks “What noise is around you?”, with Keyboard & mouse picked, and “How strong?”, with Balanced picked. Hold to turn off is at the bottom right.The Noise Reduction editor on the Microphone channel, Simple view. It asks “What noise is around you?”, with Keyboard & mouse picked, and “How strong?”, with Balanced picked. Hold to turn off is at the bottom right.
The Noise Reduction editor on the Microphone channel, Simple view, in a narrow window. Cafe & chatter is picked as the place, and Strong as the strength.The Noise Reduction editor on the Microphone channel, Simple view, in a narrow window. Cafe & chatter is picked as the place, and Strong as the strength.

A and B keep two settings of the plugin, so you can switch between them while you listen. Hold to turn off lets you hear the sound without the plugin for as long as you hold it.

Plugins that listen ahead, like Noise Reduction, add a little delay. DARA shows it on the channel and delays the other channels to match.

To reuse a channel’s built-in plugins on another channel, choose Save plugins as stack… from the channel’s right-click menu. It shows up under Stacks when you click Add plugin.

If a plugin crashes while DARA scans it, DARA blocks it.

Mixes and sends

You can have up to ten mixes. A send sets how much of a channel goes into one mix.

  1. Click Add send at the bottom of a channel.
  2. Pick the mix. Choose one you already have, or Create mix.
  3. Set the level with the send’s fader.
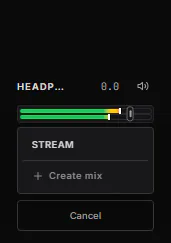
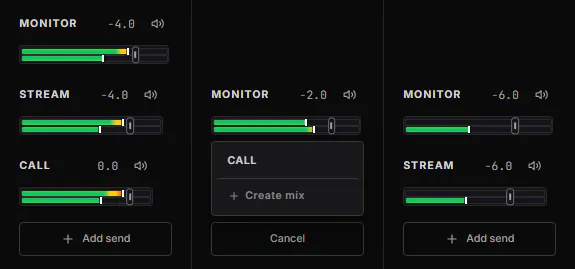
The mixes on the Games, Voice chat and Browser channels. Games has a new CALL mix under MONITOR and STREAM, made with Create mix. The Add send menu is open on Voice chat and offers the CALL mix or Create mix.The mixes on the Games, Voice chat and Browser channels. Games has a new CALL mix under MONITOR and STREAM, made with Create mix. The Add send menu is open on Voice chat and offers the CALL mix or Create mix.
The mixes on the Voice chat channel, with the Add send menu open. It offers the CALL mix, made on Games a moment before, or Create mix.The mixes on the Voice chat channel, with the Add send menu open. It offers the CALL mix, made on Games a moment before, or Create mix.

Set a level

  • Drag the send’s fader.
  • Double-click it to go back to 0 dB.
  • Click the number to type a value. Type -inf for silence.
  • Click the speaker icon to mute that send. The channel keeps playing in your other mixes.
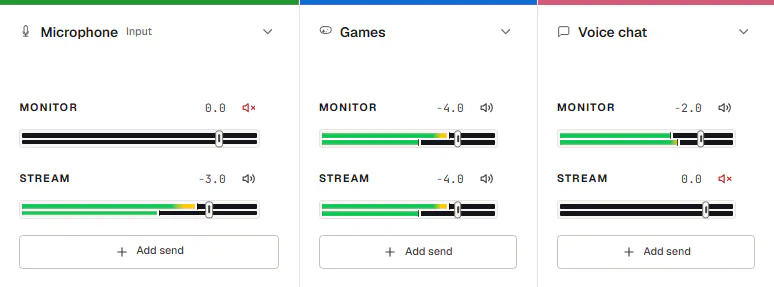
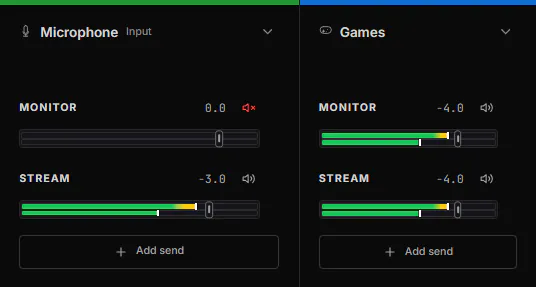
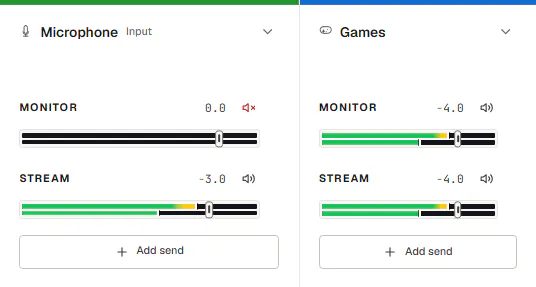
The MONITOR and STREAM sends of the Microphone, Games and Voice chat channels. The mic is muted in MONITOR and on in STREAM. Games is on in both. Voice chat is on in MONITOR and muted in STREAM.The MONITOR and STREAM sends of the Microphone, Games and Voice chat channels. The mic is muted in MONITOR and on in STREAM. Games is on in both. Voice chat is on in MONITOR and muted in STREAM.The MONITOR and STREAM sends of the Microphone and Games channels. The mic is muted in MONITOR and on in STREAM. Games is on in both.The MONITOR and STREAM sends of the Microphone and Games channels. The mic is muted in MONITOR and on in STREAM. Games is on in both.
Your voice goes to the stream and stays out of your own headphones. Voice chat plays in your headphones and stays off the stream.

If you remove the last send to a mix, the mix goes too, along with its recording device in Windows. DARA asks first, and Ctrl+Z brings it back.

Master and outputs

The master section on the right has one fader for each mix.

  1. Pick the mix you hear. Click the headphones button on that mix.
  2. Pick where you hear it. Choose your headphones or speakers under Output.

To play a mix on a second device, right-click its master fader and choose Output device. Then pick the device. Any mix can have one, and it keeps its recording device in Windows.
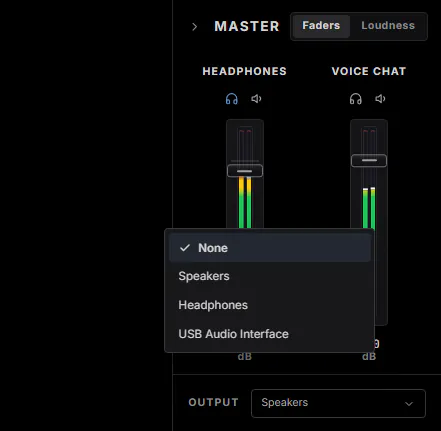
The master section with its MONITOR and STREAM mixes. The MONITOR mix was right-clicked and Output device picked, and its device menu is open: None, Speakers, Headphones and USB Audio Interface.The master section with its MONITOR and STREAM mixes. The MONITOR mix was right-clicked and Output device picked, and its device menu is open: None, Speakers, Headphones and USB Audio Interface.

Double-click a mix’s name to rename it. Its recording device in Windows takes the new name.

Switch to Loudness to see how loud each mix is in LUFS, with its true peak and loudness range. Pick a target like Spotify, YouTube or EBU R128, and DARA shows how far off the mix is.

Scenes

A scene saves the whole mixer under one name. It keeps your channels and their apps, plugins, sends, mixes and master levels.

  1. Click Scenes in the title bar.
  2. Save one. Choose Save mixer as scene.
  3. Load one. Click a scene to switch to it.
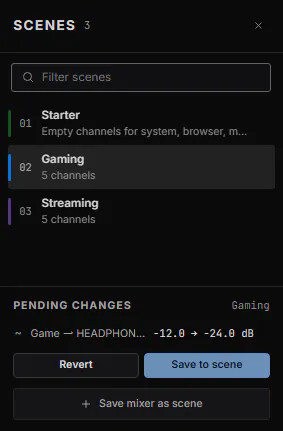
The Scenes panel lists Starter, Gaming and Streaming, and Gaming is active. Since it was loaded, the Games channel’s MONITOR level moved from -4 to -24 dB, and Pending changes lists it, with Revert and Save to scene under it. Save mixer as scene is at the bottom.The Scenes panel lists Starter, Gaming and Streaming, and Gaming is active. Since it was loaded, the Games channel’s MONITOR level moved from -4 to -24 dB, and Pending changes lists it, with Revert and Save to scene under it. Save mixer as scene is at the bottom.

After you change something, Pending changes lists what’s different from the scene. Choose Revert to go back, or Save to scene to keep it.

DARA asks before a scene replaces unsaved changes. If you load the wrong scene, press Ctrl+Z.

Hotkeys and MIDI

Global hotkeys work anywhere in Windows, even in a game. These are the defaults:

Default global hotkeys
Ctrl+Shift+MMute microphone
F24Push-to-talk
Ctrl+Alt+DShow or hide DARA
Ctrl+Alt+QDuck all mixes

Duck all mixes turns every mix down at once. Press it again to bring them back up.

Push-to-talk starts on F24, a key most keyboards don’t have, so set your own.

Change a hotkey

  1. Open Settings and go to Windows integration.
  2. Click the hotkey under Global hotkeys.
  3. Press the new keys. Esc cancels.
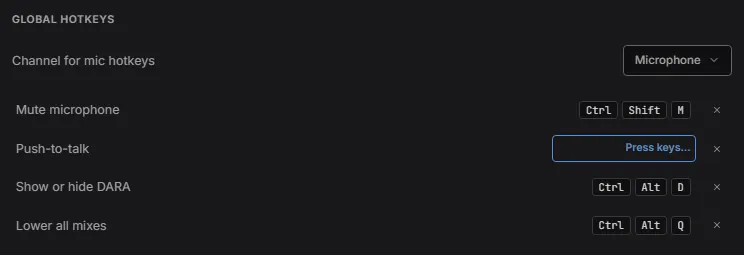
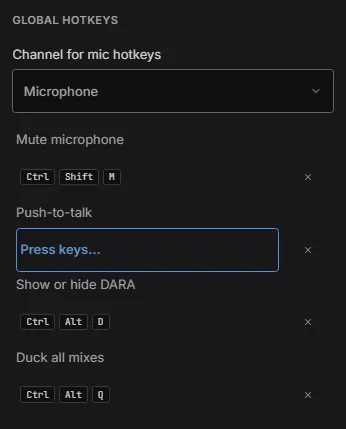
Global hotkeys in Settings: the mic channel the hotkeys act on (Microphone), then Mute microphone on Ctrl + Shift + M, Push-to-talk waiting for you to press its new keys, Show or hide DARA on Ctrl + Alt + D and Duck all mixes on Ctrl + Alt + Q.Global hotkeys in Settings: the mic channel the hotkeys act on (Microphone), then Mute microphone on Ctrl + Shift + M, Push-to-talk waiting for you to press its new keys, Show or hide DARA on Ctrl + Alt + D and Duck all mixes on Ctrl + Alt + Q.

Mute microphone and Push-to-talk work on the channel you pick under Channel for mic hotkeys.

If another app already uses a key combination, DARA can’t use it. Pick a different one.

Use a MIDI controller

  1. Pick your controller in Settings, under MIDI devices.
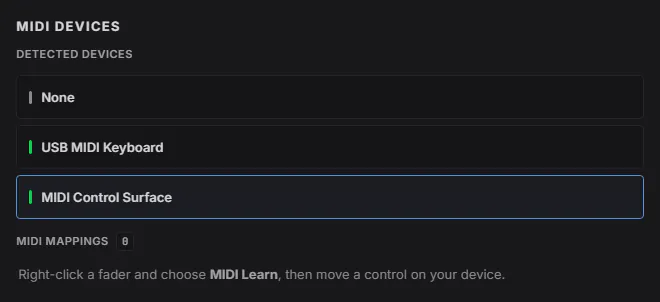
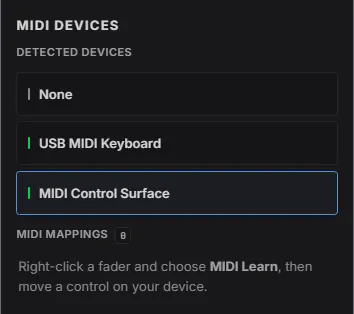
MIDI devices in Settings: the detected devices None, USB MIDI Keyboard and MIDI Control Surface, with MIDI Control Surface selected. Under them, MIDI mappings (none yet) says: right-click any fader, pick MIDI Learn, then move a control on your device.MIDI devices in Settings: the detected devices None, USB MIDI Keyboard and MIDI Control Surface, with MIDI Control Surface selected. Under them, MIDI mappings (none yet) says: right-click any fader, pick MIDI Learn, then move a control on your device.
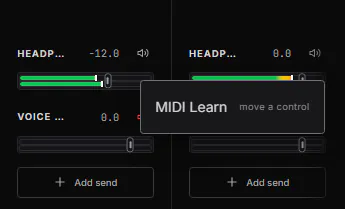
  1. Right-click a fader and choose MIDI Learn.
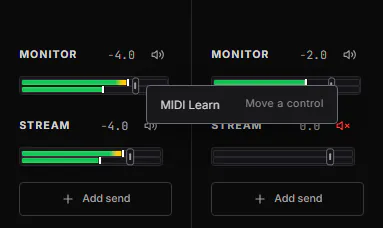
The Games and Voice chat channels’ mixes, with MIDI Control Surface picked in Settings. The MONITOR fader on Games was right-clicked and its menu offers MIDI Learn, “Move a control”.The Games and Voice chat channels’ mixes, with MIDI Control Surface picked in Settings. The MONITOR fader on Games was right-clicked and its menu offers MIDI Learn, “Move a control”.
The Games channel’s mixes in a narrow window, with MIDI Control Surface picked in Settings. Its MONITOR fader was right-clicked and its menu offers MIDI Learn, “Move a control”.The Games channel’s mixes in a narrow window, with MIDI Control Surface picked in Settings. Its MONITOR fader was right-clicked and its menu offers MIDI Learn, “Move a control”.
  1. Move a knob or fader on your controller.

To undo it, right-click the fader and choose Remove MIDI mapping.

Point apps at DARA

Most apps play through the Windows default device, and DARA is that device now. Some apps, like Discord, OBS and Zoom, keep their own device setting, so you set them once.

Each mix shows up in Windows as a recording device named after the mix. Point each app at the mix you made for it.

Where to point apps that keep their own device setting
AppWhereWhat to set
DiscordSettings, Voice & VideoOutput to System, and the input to your mix
OBSSources, Add, Audio Input CaptureDevice to your mix
ZoomSettings, AudioSpeaker to System, and the microphone to your mix
Audacity, REAPER or another recorderAudio settings, recording deviceYour mix

Settings

Click the gear in the title bar to open Settings. It has these parts:

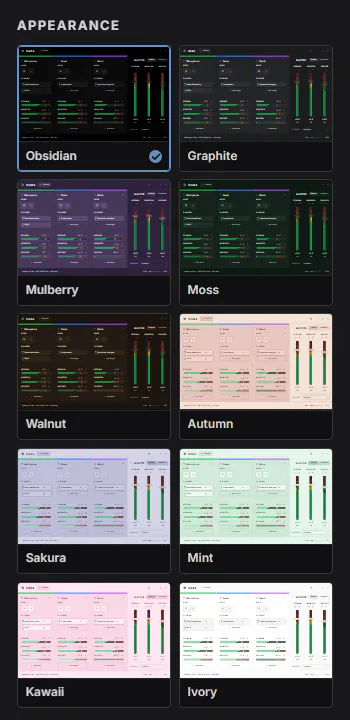
  • Appearance. Ten themes, ten typefaces plus your system font, and ten languages. Welcome tutorial and First-time setup are here too.
  • Windows integration. Start DARA with Windows, keep it in the system tray, and change the global hotkeys.
  • Audio engine. Set the output buffer, from the device default down to 3 ms. Adapt when the PC is busy raises it for a moment when your PC can’t keep up.
  • Inputs and outputs. Pick the device DARA plays on. Under Windows default devices, DARA can keep one channel as the Windows default output and one mix as the default recording device.
  • Plugins. Choose Rescan after you install new VST3 or CLAP plugins.
  • Backup. Export… saves your mixer and settings to one file, and Import… loads it back.
  • MIDI devices. Pick your MIDI controller and see what it’s mapped to.
  • Keyboard shortcuts. Click a shortcut, then press the new keys. Reset all puts every shortcut back to its default.
  • License. Activate DARA, or deactivate it on this PC.
  • Privacy & updates. Choose what diagnostic data DARA may send.
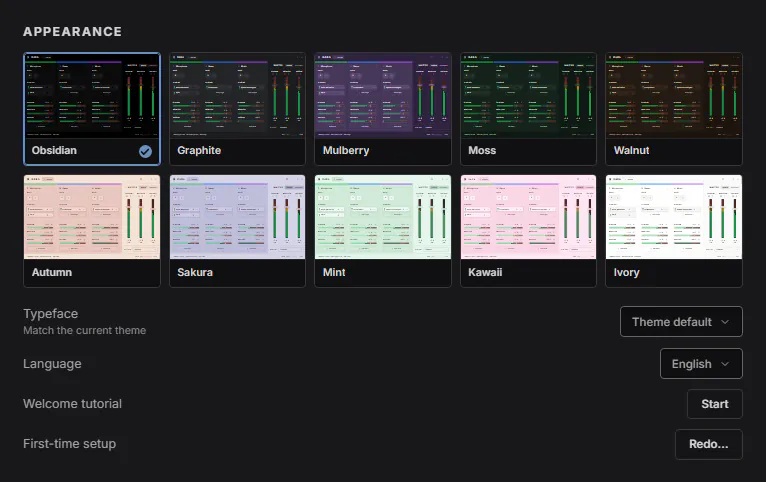
Appearance in Settings: the ten themes (Obsidian, Graphite, Mulberry, Moss, Walnut, Autumn, Sakura, Mint, Kawaii and Ivory) with the current one ticked, then Typeface, Language, Welcome tutorial with its Start button, and First-time setup with its Redo… button.Appearance in Settings: the ten themes (Obsidian, Graphite, Mulberry, Moss, Walnut, Autumn, Sakura, Mint, Kawaii and Ivory) with the current one ticked, then Typeface, Language, Welcome tutorial with its Start button, and First-time setup with its Redo… button.
Appearance in Settings, in a narrow window: the ten themes (Obsidian, Graphite, Mulberry, Moss, Walnut, Autumn, Sakura, Mint, Kawaii and Ivory) in two columns, with the current one ticked.Appearance in Settings, in a narrow window: the ten themes (Obsidian, Graphite, Mulberry, Moss, Walnut, Autumn, Sakura, Mint, Kawaii and Ivory) in two columns, with the current one ticked.

Keyboard

With a fader selected:

Left arrow or Right arrowMove 0.5 dB
Shift + Left arrow or Right arrowMove 3 dB
HomeBack to 0 dB
Left arrow below -60 dBSilence
Double-clickBack to 0 dB
Click the numberType a value. Type -inf for silence.
Right-clickMIDI Learn

Anywhere in DARA:

Ctrl+ZUndo
Ctrl+YRedo

Press ? in DARA to see every shortcut. To change one, open Settings and go to Keyboard shortcuts.

Your license

One license can be active on two PCs.

The first time DARA opens, it asks for your key. Paste it and choose Activate DARA. To check or change your key later, open Settings, then License.

To use DARA on another PC, install it there and activate it with your key. If your license is already on two PCs, DARA asks which one to move it from. The license agreement says how often you can move it.

Your key is in your purchase email. The confirmation page also shows it for 24 hours.

If you lose it, you can request a replacement key on the key recovery page, or email support@daraaudio.com from the address you paid with and include your order number. Keep your key private. If we need it, send only the last four characters.

For anything else, see the support page.